Saturday, December 8. 2012Serving spanwire, part 1NO! this is not a recipe for Christmas dinner. The skills and knowledge used to build trolley overhead are being lost to time, especially the historic methods. In an effort to preserve these methods and possibly bring some youthful new volunteers to IRM's Line Department, I present a series of "how It's done" stories. It combines My experience in over 40 years of linework, what I learned from my predecessors at IRM, what I learned from talking to "old timers" that actual built the stuff and from my own research. The methods I describe are NOT the only correct ways to do it. There are many variations. These methods are how I do it at IRM. They are standards that work best at IRM. Serving is a term given to a method of dead ending or attaching wire to hardware and insulators where the wire is formed in a loop or eye and each strand is then separately wrapped back around the wire. This method can be used on copper or aluminum conductor or steel strand ( span wire). It can also be used to splice wire. The only requirements are that the material is soft and malleable enough to be bent around itself without breaking and you have the time to do all that wrapping. Serving has lost it's preference because newer high strength wires are harder and break when bent sharply. But mainly because clamps, preforms and automatic dead ends are faster. If your paying for time, buying and using those devices are cheaper than labor intensive serving. To complete a served attachment takes about 10 to 20 minutes.  two johnney balls attached to span wire by the serving method. Which would you trust? A served attachment works like "chinese fingers". The wire is passed around the attachment and brought back on itself , then each strand is tightly wrapped back around the wire and remaining strands from 4 to7 times( IRM standard is 6 wraps). This is repeated until all the strands are wrapped. When tension is applied the wraps will cock and grip the wire tightly. The harder the pull the tighter the grip. If not done correctly the serve will slip and choke up. If on hardware this will cause the wire to become slack. if on a johnney ball, not only will the wire become slack but the insulator will twist and may break. 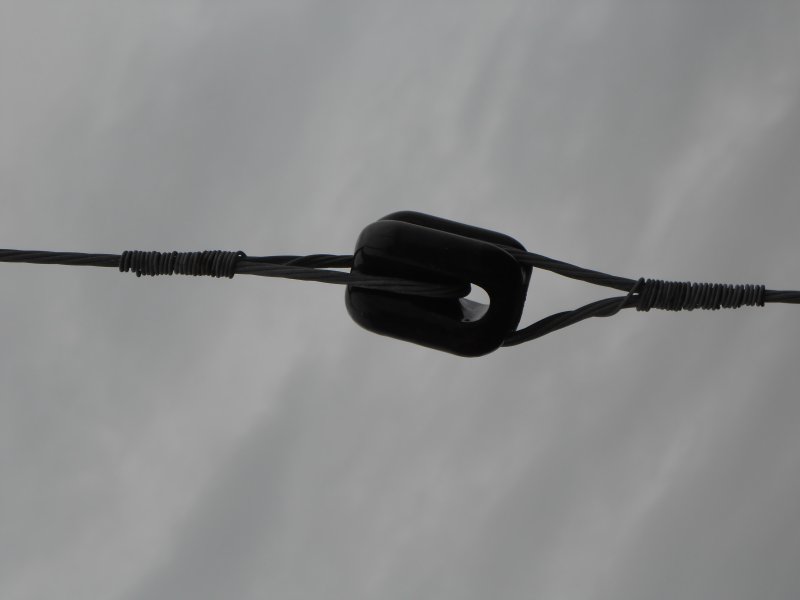 Insulator is twisted because serving slipped and choked up. You begin the attachment by forming a U in the wire. The tail should be at least 18" long. About 4" down from the U both legs are bent outward slightly. 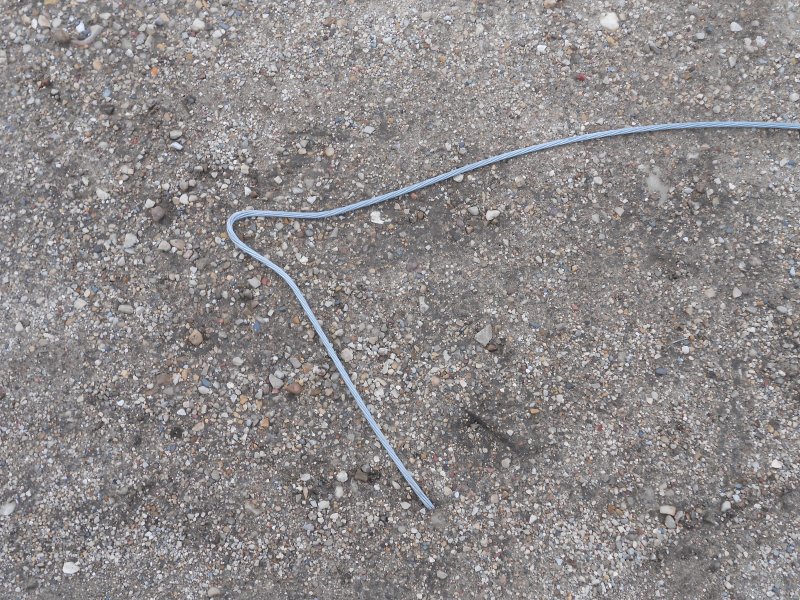 Wire prepared for hardware or insulator attachment. The wire is now slid into the hardware. 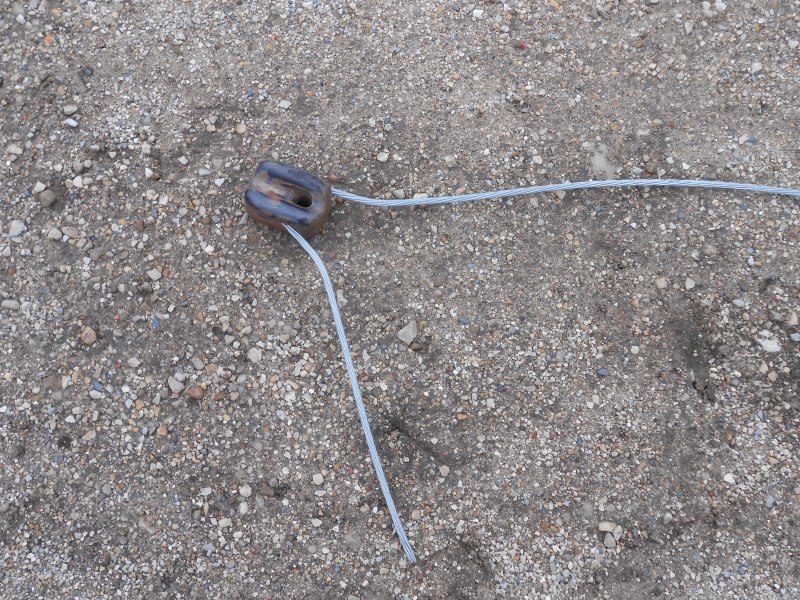 Johnney ball is placed on wire. Now you need to secure the assembly. Bolt the hardware to the pole or your helper can hold it. Since I don't have a helper, I use a vise. Unwrap one strand to the center of the slight bend. The best strand to choose is the one that will be on the outside of the loop at the slight bend. With pliers, grasp the wire in the jaws including the strand you just unwrapped. Sharply bend the strand until it is perpendicular to the wire, the base should be in the center of the slight bend. 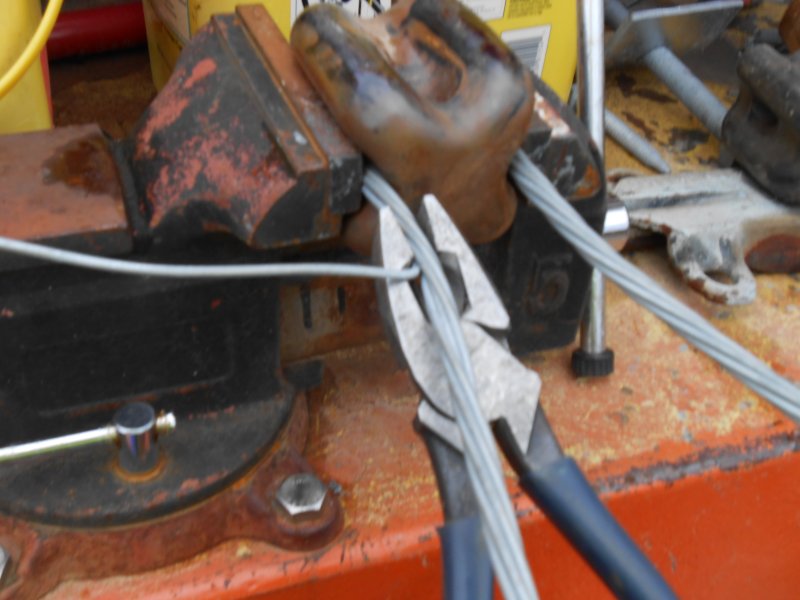 Pick the right strand bend it sharply as shown Grasp the strand with pliers and using the wire as a pivot pull the strand around the wire and remaining strands bringing all tightly together. Go clockwise or with the lay of the strands. 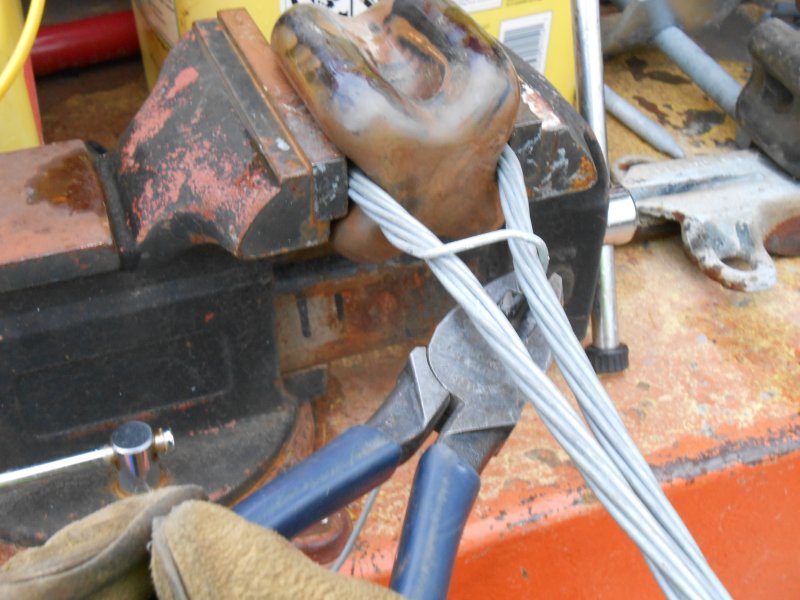 Pull the strand around everything. Go clockwise. Hold the strand with one hand so it doesn't unwrap. Reposition the pliers so the strand is in the cutting knives with the nose of the pliers against the wire at the base of the strand. Control the "squeeze" on the handles. You want to grip the strand not cut it. The first few times you do this you WILL cut the strand. We all did. You need to practice then you'll get the feel for it. After a hundred or so serves you'll be fine. Push the pliers clockwise controlling the squeeze and cinch up the strand tightly around the wire and remaining strands. 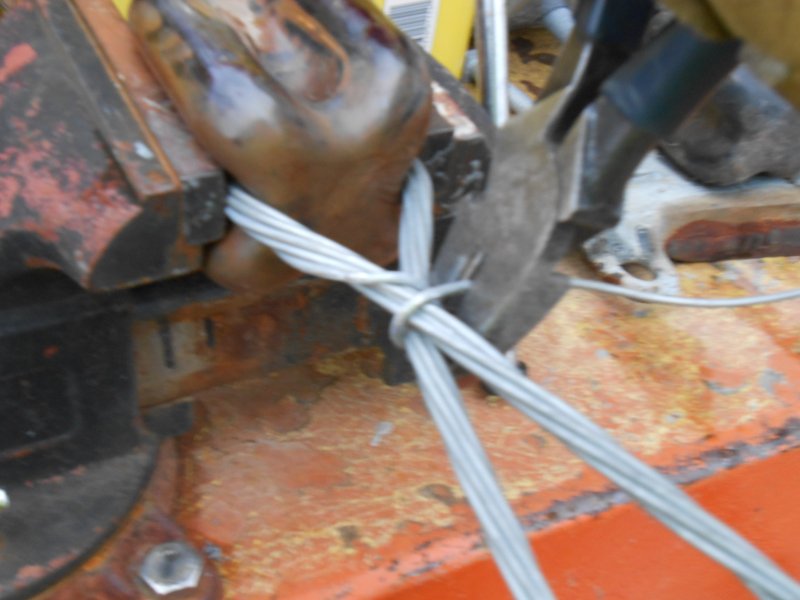 Reposition pliers, cinch up the first wrap. Control the squeeze. Continue wrapping and cinching untill 6 wraps are done. Do not take the pliers off or release pressure until all 6 wraps are done. When you get to the 6th wrap stop and nick the strand with the pliers. Continue into the 7th wrap. The strand will break off at the nick. 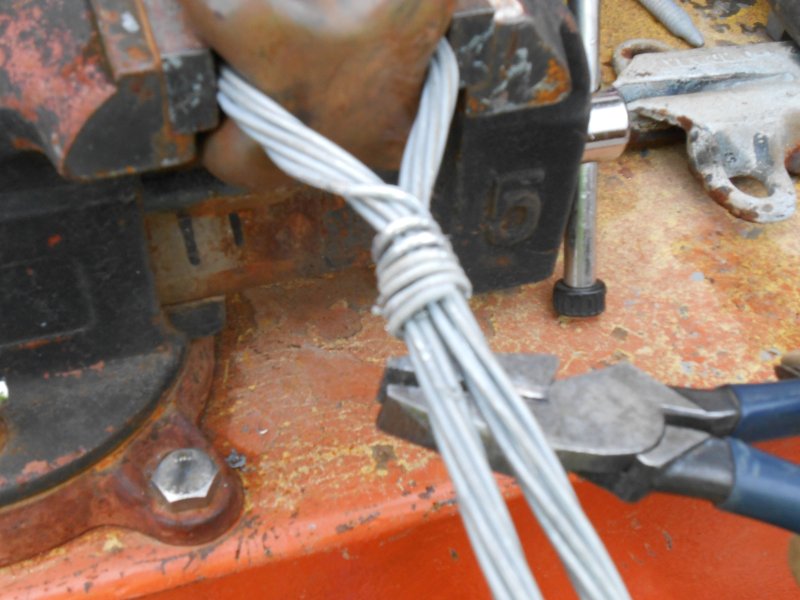 Controll the squeeze, nick the last wrap. The strand will break at the nick. Unrap the next strand. You want the one that butts up to the end of the first one. Bend this one perpendicular to the wire with a sharp bend at the base. Tapping with pliers helps make a sharp bend. 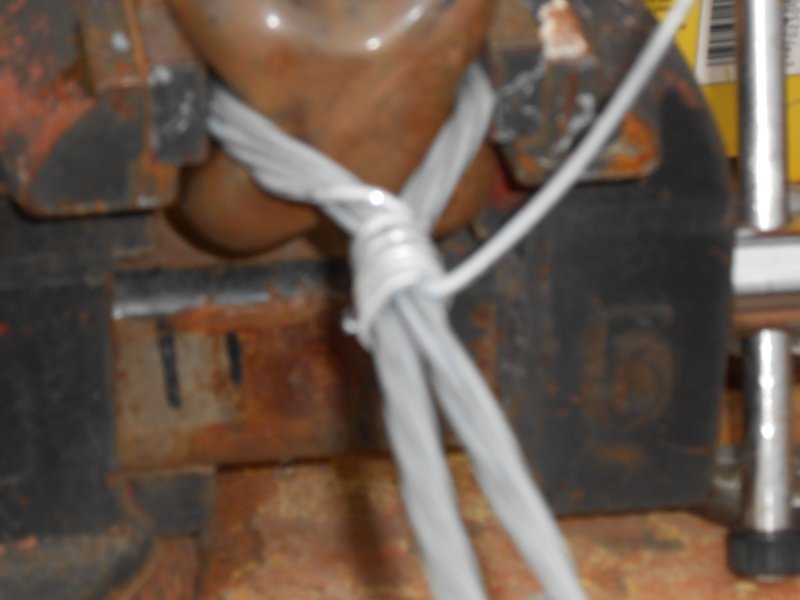 The start of the 2nd strand should butt up against the end of the 1st. With the second strand positioned in the plier cutting knives, wrap and cinch 6 turns. Remember to control the squeeze. Nick and break after 6 wraps. 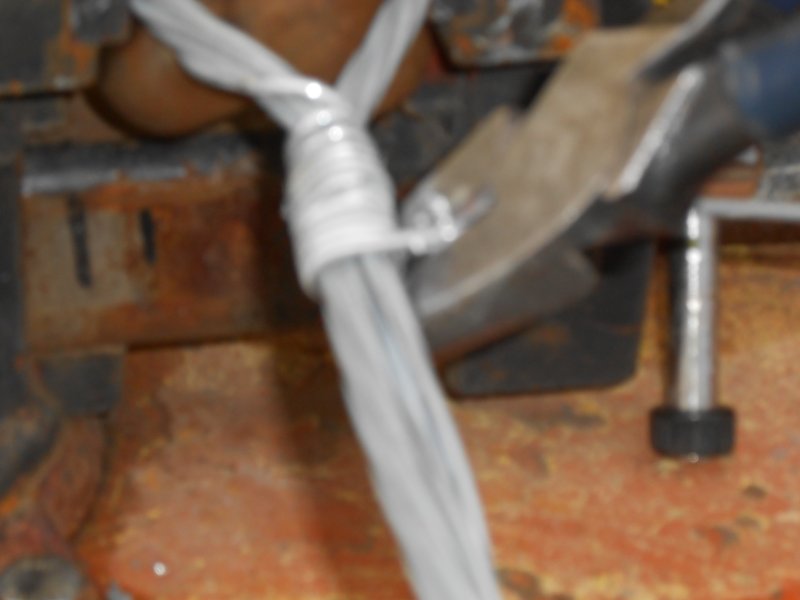 Wrap, cinch, nick and break. Repete the wrapping with the remaining strands. 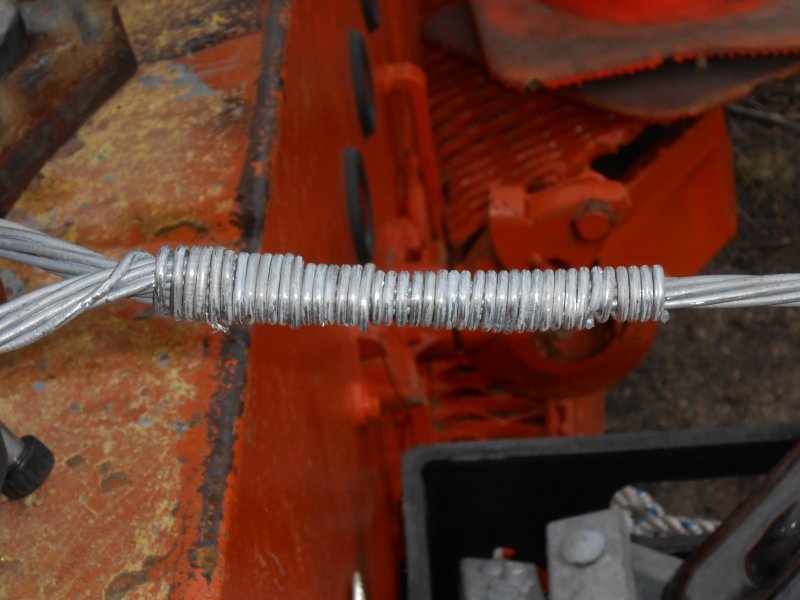 Completed serve Your done! This takes lots of practice. Guys that are really good can wrap two strands at once. |
Blog AdministrationCalendar
QuicksearchArchivesSyndicate This Blog |
||||||||||||||||||||||||||||||||||||||||||||||||||||||||

Comments
Fri, 03-29-2024 21:26
We're slackers and spend more time working on the equipment in the shop than keeping all you readers updated. We'll work on it, but I'm sure updates [...]
Thu, 03-14-2024 08:02
What happened to the Department Blog? It's been over 2 years and I still regularly check for updates, but nothing comes...
Mon, 12-27-2021 16:28
Happy New Year to all the Departments at the Illinois railway Museum! Thanks for all the good work you do in railroad preservation. Ted Miles, [...]
Wed, 10-13-2021 13:33
Was the CB&Q 1309 every transported to IRM?I’ve been reading old issues of Rail&Wire and the car was mentioned several times.
Mon, 06-07-2021 22:40
I was wondering if in the model layout display what scale would you guys be using and would you be displaying model train history as well? Just [...]
Wed, 06-02-2021 17:27
Nice to see 428's cab back on. Looking forward to when it is operable!
Tue, 06-01-2021 16:47
I hope the work will continue on the UP #428. Now that they are the museum's connection to the national railroad network; she would be very [...]
Sat, 04-17-2021 23:07
What is the status of 126, the Milwaukee Buffet car that is in S. Dakota? Any guess on when or if it will get to IRM?
Wed, 04-14-2021 21:09
Perhaps it is time to scrap the remains of the c, B & Q 7128 to make room for the Villa Real. Ted miles, IRM member
Wed, 04-14-2021 15:26
Hi IRM my name is Jason and I was wonder If you guys would be willing to save a CN Dash8-40cm they are currently being retired by CN and being [...]
Fri, 04-09-2021 19:56
Bear in mind that the Nebraska Zephyr is an articulated train set, so cars cannot be inserted at will. Although cars and/or a second engine could be [...]
Wed, 03-31-2021 11:37
I believe Silver Pony is currently on the back burner, and has been put into storage in one of the barns. The car needs a lot of work done to it's [...]