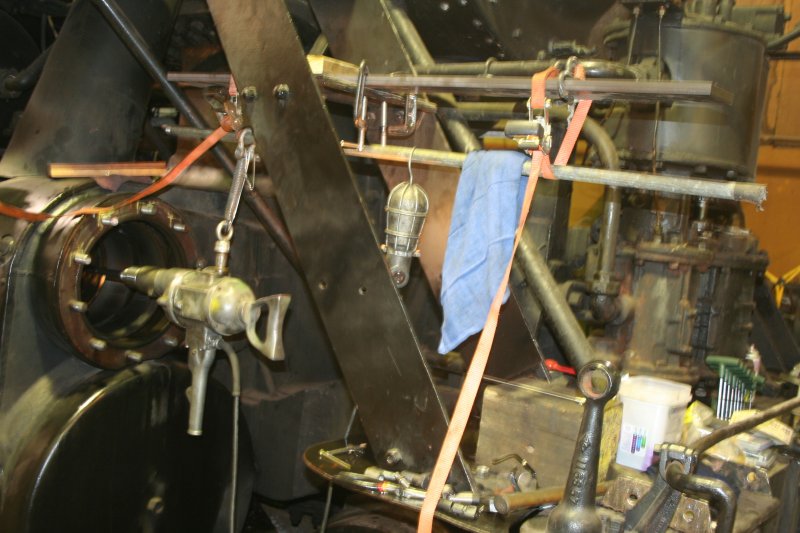
Sunday, May 1. 2016Thursday, April 28. 2016Steam Department Update March / April 2016I find myself using almost exactly the same introduction as for the turntable update. A great deal has been achieved but everything seems to be taking just that bit longer than had been hoped. Obviously the focus in the shop has been upon #1630 and getting her ready for the new season. Work has been progressing on two fronts at the same time. The first is the preparation for the hydrostatic test of the boiler after all the annual inspection activities and the second is the reassembly of the valves after a thorough overhaul. The preparation for the hydro test has been frustrating. In the past couple of years, we have occasionally seen issues with minor leakage from one or two super heater flues where they are expanded into the firebox tube sheet. This year we obtained some new rollers to try to get a better seal. The results were excellent. Since this was done we have no sign of leakage from the flues that have previously been a nuisance. Just by way of revenge!, we have had difficulty getting a couple of wash out plugs, that are removed annually and have never previously caused problems, to seal completely dry. Anyway, after a couple of iterations, everything now seems to be dry and we will aim to do the full test at 125% pressure under FRA inspection this weekend. Just about everything related to the valves is now machined and ready to reassemble. The honing of the re-bored valve chambers proved a longer and more tedious process than initially anticipated. Many thanks to Rod Turner for his efforts on getting this done. The first big challenge was to establish a satisfactory method for driving the hone. The bores are large so the rotation speed needs to be slow. An old nut driver that provided a suitably slow speed of rotation had to be refurbished to achieve this. Then you need this to be held at a level that keeps it reasonably at the level of the center of the bore but allows it to be moved smoothly back and fore. The assembly of suspension by heavy springs achieved this.
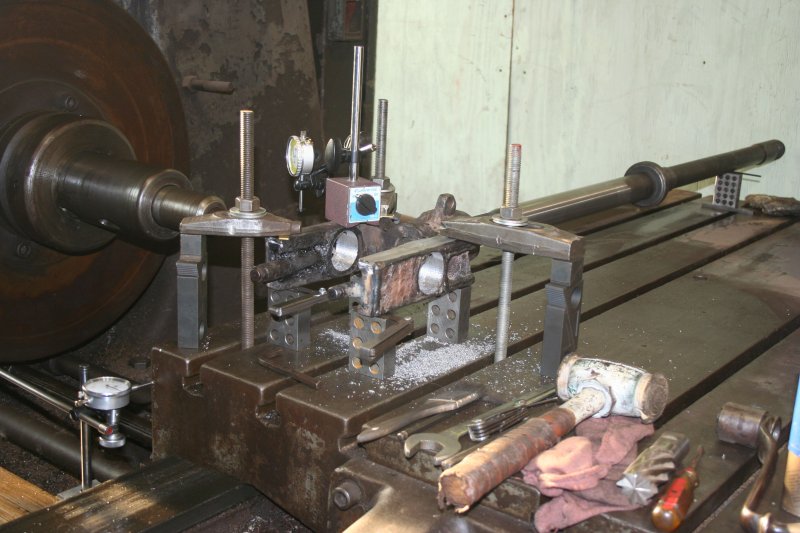
The honing stones that actually smooth the bores look like this.
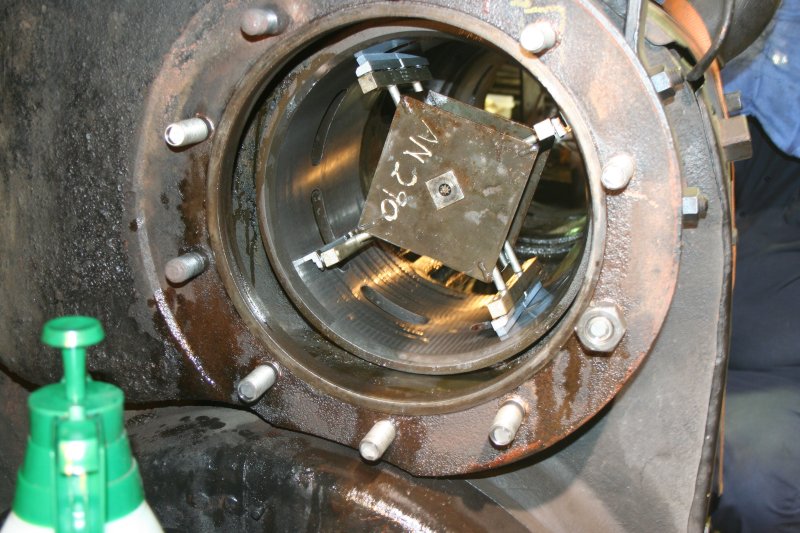
Now the bores just need to be thoroughly cleaned and re-assembly of the valves will start this weekend. Another job has been the build-up and re-machining of the crosshead from the fireman’s side. The crosshead mounts between plates bolted to the guide above and below. The puzzle was that this one was a very sloppy fit laterally while the ES one was a reasonable sliding fit. It may well be that this part has been loose for many years as it does not appear to show wear to explain the loose fit. Anyway, it is clearly preferable that it should be a sliding fit, so it was built up with weld and is here being machined to size.
The new babbit in the main crosshead shoe has been machined to fit and the shoe put back on the crosshead. Unfortunately the locomotive has been moved slightly since it was removed, so now of the bolts cannot be fitted until the locomotive is moved back a few inches!. Work has proceeded on lagging the Shay but this has inevitably taken a back seat to work on #1630. In the shop, Collin has made major progress on the new big air compressor. This has now tested well, after a couple of valves and seals were replaced. Now we wait on completion of the wiring and belt guards to allow the system to be fully tested and made ready for State inspection. Progress has also been made on setting up the power supply to the wheel lathe We are still scheduling to run Memorial Day weekend. However, this will depend upon a lot being achieved in a short time and so without much in the way of the “little tribulations” that have hindered us in the last month or two. Every effort will be made to run Memorial Day weekend but my current advice would be to watch for updates and not to make firm plans yet based upon seeing #1630 running that weekend. NigelThursday, April 28. 2016Turntable Update April 28th 2016
It has been a couple of weeks of good progress but everything taking that little bit longer than we might have hoped.
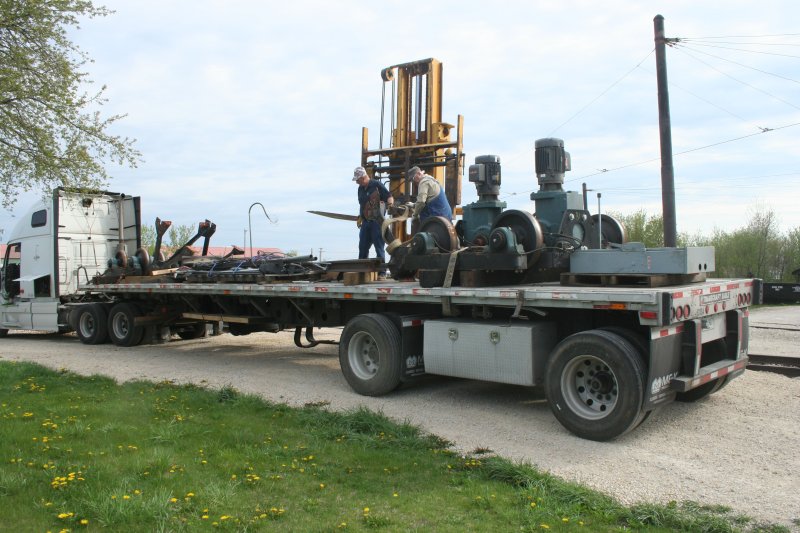
We waited a full week before UP could deliver the flatcar to the site for loading. Once that arrived, there was a surge of activity.
Securing plates were welded to the flatcar and then, within 24 hours, the turntable deck and all remaining parts were removed from the pit and loaded last Thursday. The pictures show what was involved. The move was done by Hulcher using two of their side lifters, which was a very efficient way of doing this job as compared to crane lifting
The large central bearing was secured to the table and lifted with the main beam to avoid a separate crane lift.
The trucks, center bearing and all remaining wiring, rails etc. were loaded on a flatbed truck and were safely unloaded and stored at Union by Monday of this week.
At Burnham, with the table now on the flatcar, work progressed in securing this to ensure its safety during the move. This involved the attachment of substantial steel cables, attached to mounting points welded to the flatcar. The arrangement and implementation of the attachment must all be reviewed and approved by the specialist group in UP responsible for these large loads.
After a couple of iterations involving the addition of some additional reinforcing plates to strengthen the mounting points on the flatcar, we received confirmation today that table is now satisfactorily secured.
We now await the switching of the idler cars to be connected at each end of the flatcar to protect the overhanging ends. Once these are coupled, the couplings between these are the flatcar must be disabled (the load consists of all 3 cars so the couplings must be disabled to prevent any possibility of accidental separation enroute).
So, after 75 years, the table is just about ready to leave Burnham and make its way to it new home at Union.
Nigel
|
Blog AdministrationCalendar
QuicksearchArchivesSyndicate This Blog |
|||||||||||||||||||||||||||||||||||||||||||||||||


Comments
Fri, 03-29-2024 21:26
We're slackers and spend more time working on the equipment in the shop than keeping all you readers updated. We'll work on it, but I'm sure updates [...]
Thu, 03-14-2024 08:02
What happened to the Department Blog? It's been over 2 years and I still regularly check for updates, but nothing comes...
Mon, 12-27-2021 16:28
Happy New Year to all the Departments at the Illinois railway Museum! Thanks for all the good work you do in railroad preservation. Ted Miles, [...]
Wed, 10-13-2021 13:33
Was the CB&Q 1309 every transported to IRM?I’ve been reading old issues of Rail&Wire and the car was mentioned several times.
Mon, 06-07-2021 22:40
I was wondering if in the model layout display what scale would you guys be using and would you be displaying model train history as well? Just [...]
Wed, 06-02-2021 17:27
Nice to see 428's cab back on. Looking forward to when it is operable!
Tue, 06-01-2021 16:47
I hope the work will continue on the UP #428. Now that they are the museum's connection to the national railroad network; she would be very [...]
Sat, 04-17-2021 23:07
What is the status of 126, the Milwaukee Buffet car that is in S. Dakota? Any guess on when or if it will get to IRM?
Wed, 04-14-2021 21:09
Perhaps it is time to scrap the remains of the c, B & Q 7128 to make room for the Villa Real. Ted miles, IRM member
Wed, 04-14-2021 15:26
Hi IRM my name is Jason and I was wonder If you guys would be willing to save a CN Dash8-40cm they are currently being retired by CN and being [...]
Fri, 04-09-2021 19:56
Bear in mind that the Nebraska Zephyr is an articulated train set, so cars cannot be inserted at will. Although cars and/or a second engine could be [...]
Wed, 03-31-2021 11:37
I believe Silver Pony is currently on the back burner, and has been put into storage in one of the barns. The car needs a lot of work done to it's [...]