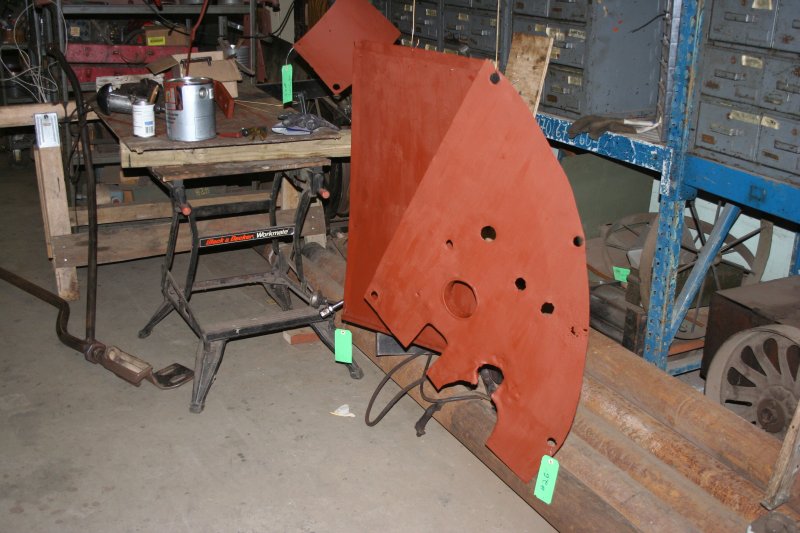
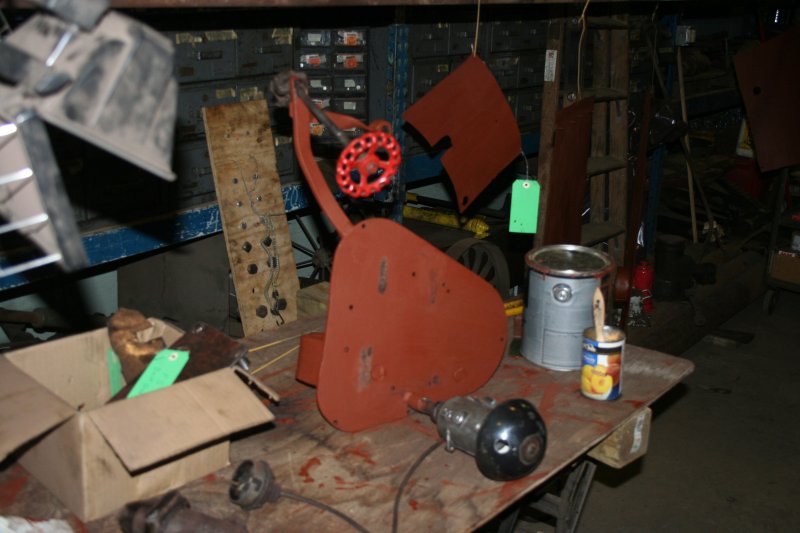
Sunday, February 10. 2013Steam Department Update 02-09-2013While it was a part day in the shop for me, as I attended the Board meeting in the morning on behalf of the department, a larger team braved the snow and ice and good progress was made in a number of areas. On 1630: · the first of the cladding sheets, as well as a number of cab fittings were brought down from storage above the machine shop for inspection, cleaning and painting. There is a great deal of this to be done in preparation for the time when we will be able to start refitting them. Much of this is an unpleasant, dirty job as the sheet metal must be wire brushed to get rid of rust and bits of lagging. However there is now an area set up to allow cladding sheets and other parts to be painted and allowed to dry (at the opposite end of the shop from the dust generated by the cleaning process!).
Above are some of the first results including sections of the cladding, that make up the covering of the boiler backhead in the cab, and the mounting plate for the pressure gauges.
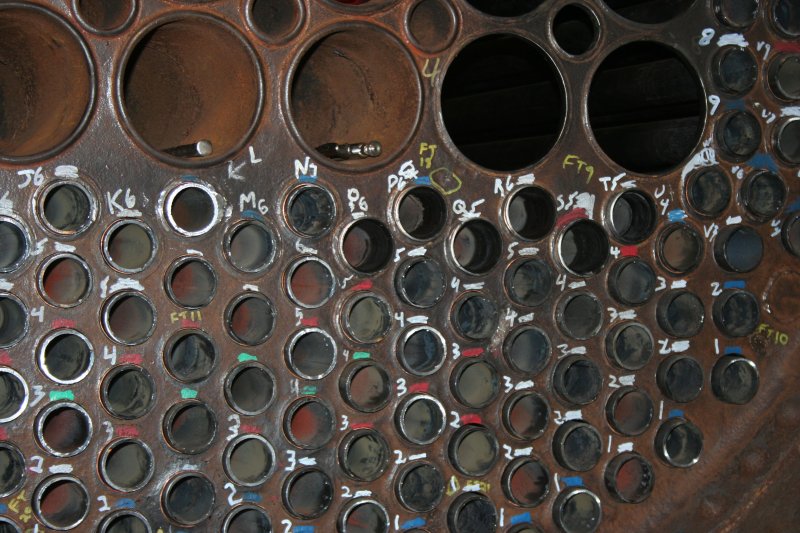
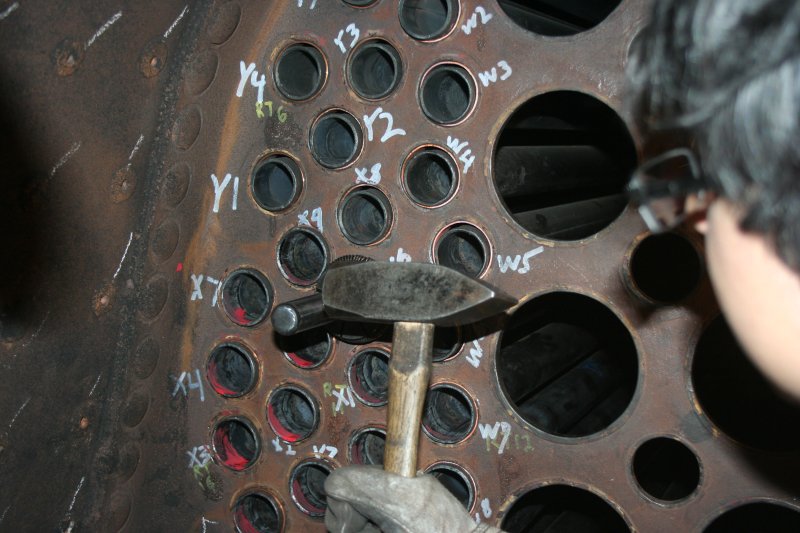
· on the tube fitting there was significant progress, more in the areas of developing processes for the next steps than in fitting large numbers of tubes. o While I was at the meeting, Collin and the guys completed removal of the rogue tube from last Saturday and put a new one in. o The new roller has arrived and we spent a good deal of time working out how best to use it. This roller is designed to both expand the end of the tube and simultaneously flare the projecting end of the tube, ready for beading. We used this to start work on the smokebox tube ends. The size of this roller should allow it to be used on both the firebox ends and those tubes at the smokebox end that require beading. Because it is a great deal easier to work in the smokebox we decided to work out how best to use it on smokebox tube ends. This proved to be a very good decision. It certainly does expand and flare the tube ends quickly and effectively. Once in place and properly driven, the process is complete in maybe 30 seconds. The snag that became obvious was that the additional force required to turn this roller, as it not only expands the tube but flares the ends at the same time, is more than our smaller air motor can provide. This is a significant issue. The smaller air motor weighs about 30 pounds and can be reasonably controlled by one person. The bigger one drives the expander with no problem but weigh 50 pounds or more. Manually supporting and locating this beast on to the expander for every hole, which we can easily do with the small motor, is pretty exhausting work for two people, as Phil and I found out. Some more development is required. While we certainly could expand the smokebox ends this way it would be slow. The operators require frequent breaks!!. Next week we will need to explore other options. We probably need to find ways of supporting the motor in places from which we can drive the expansion of multiple tubes using the flexible drive shaft, rather than attaching the motor directly to the expander and therefore carrying the full weight of the motor to every tube end. Clearly we need to develop methods that can also be used in the firebox. ... If the big motor is tough to handle in the smokebox it will be a nightmare in the firebox with the arch tubes in the way!. o Despite this we successfully expanded a number of smokebox ends. I have changed the progress measures to reflect the way we now expect to work. At the smokebox end only some tubes need to be flared (those that will subsequently be beaded) and we will do this simply by using a different roller for the expansion. So this weekend we actually flared 7 and left 4 un-flared as they will not be beaded. However in all cases this did all that we need to do to the tube before the first hydro test. At the firebox end, flaring will be a separate step. Beading will not be done at either end until after the first hydro test (so that any leakage can be corrected by additional rolling).
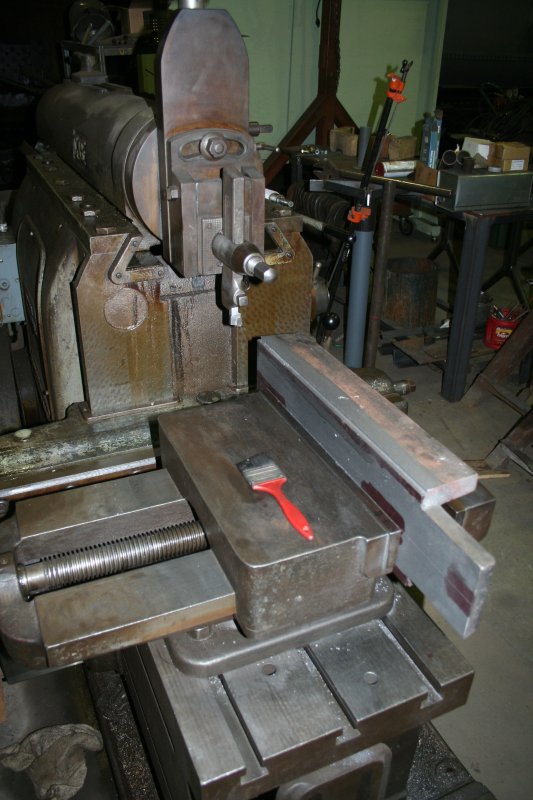
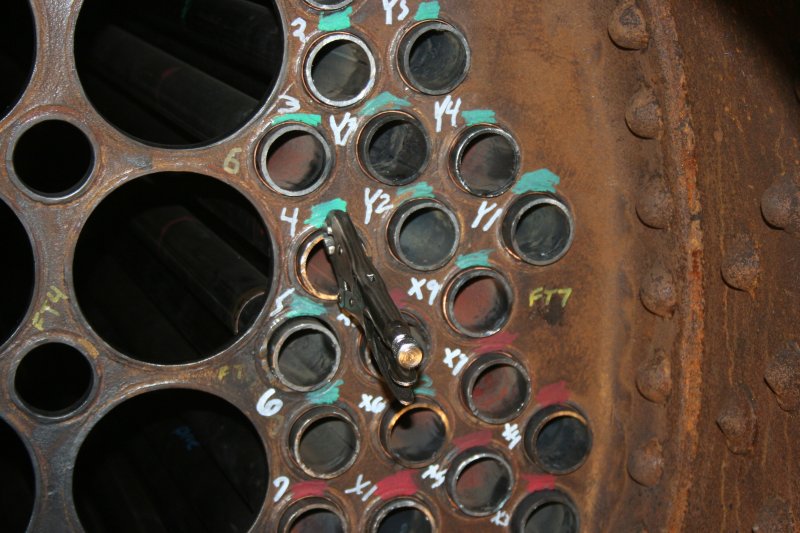
Here you can see the results on the tubes directly below the super heater flues from column P and to the right where the ends are now flared when compared to the raw tube ends in the rows below. o At the firebox end we continued to fully seal tubes that were previously set into place. Unfortunately we still hit an occasional one that shoots out the ferrule in this process and needs to be replaced. This seems to happen with those tubes that were originally set with the roller rather than they expander. At least we are now largely thru the ones that were set in this way. · The sight feed lubricator was located and Jerry started work on cleaning and checking this essential component. · The ring spacer required for the one super heater flues with an extra large hole was completed ready for refitting of the super heater flues. In other areas: · Jerry and Mike made good progress on clearing the shelving at the South West corner of the shop to make an area against the wall to store the McCabe flanger. This will be a major improvement. The flanger is, on occasions, a critical machine and had a major role in producing the patch. However, between those occasions, it a huge lump of metal that cannot readily be moved any great distance and takes up a lot of useful space!!. So the objective is to provide a storage space against the wall to free up useful space in the fabrication area when it is not required. It would be really nice if we could store it out of the shop in a container. However, it is so heavy that only the large Buildings and Grounds forklift can handle it .......... and that does not fit thru the doors of the shop! · Mike started on rebuilding the air pump for #428. He has been doing a lot of research on the cross compound air pumps and will look after all of them. He also checked out the valves on 1630's pump which looks to be in good shape after the work done a couple of years back. · Tom continued with machining the shoes and wedges for 428.
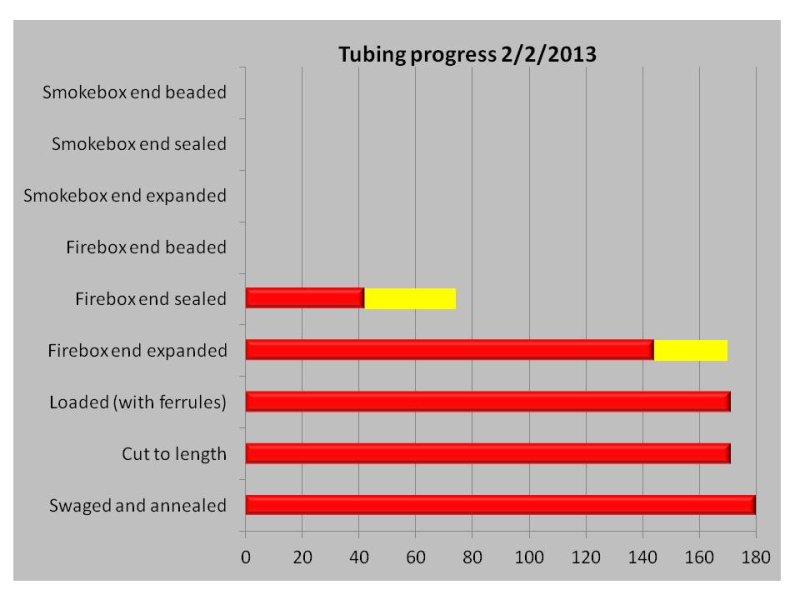
Above shows one of the shoes that will position the axle boxes in the frame. These are new iron castings as the originals were worn beyond repair. Each must be planed to exact dimensions to enable the eventual refitting of the axles. A slow and tedious process as each axle box requires one shoe and one wedge. So, overall another week of good progress. Nigel Sunday, February 3. 2013Steam Department Update 02-02-2013(With a couple of corrections 2/4/2013. Thanks to Bob for spotting that one of the links was wrong !!) The snow resulted in a limited turn out at the steam shop this weekend but a small and determined group kept things moving forward. On 1630 I worked with Phil, Dave and Cameron to continue the tube fitting:
· All the remaining ends were fully expanded on the fireman's side. · We also removed one remaining tube where the ferrule had slipped, replaced it, and fully expanded the firebox end. · This leaves a number of tubes in the center, below the super heater flue holes that were set but not fully expanded. Unfortunately, while expanding these, one moved forward removing the ferrule from the back sheet. It will have to be replaced and, having been substantially expanded, proved a bear to remove. By end of day we have largely cut the end off to enable removal and should complete that next weekend. For the first time we were able to get clear pictures of the tube expansion process so can now show rather more clearly what we have been doing for the last few weeks.
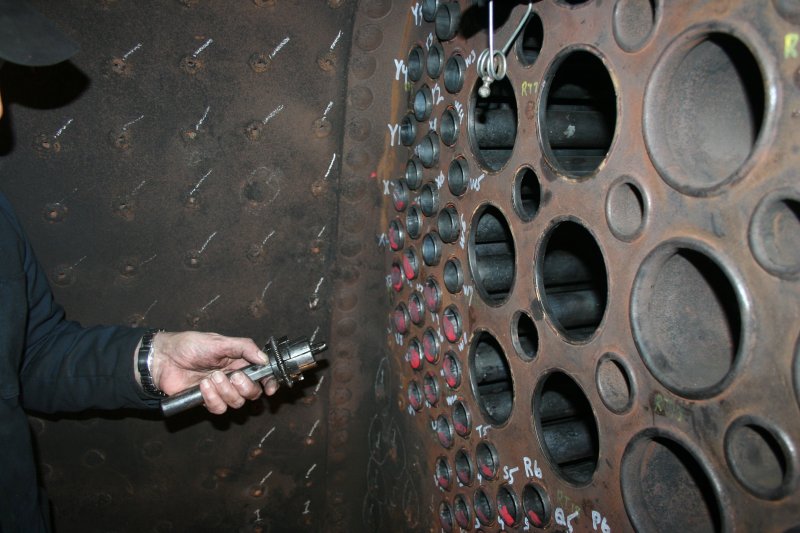
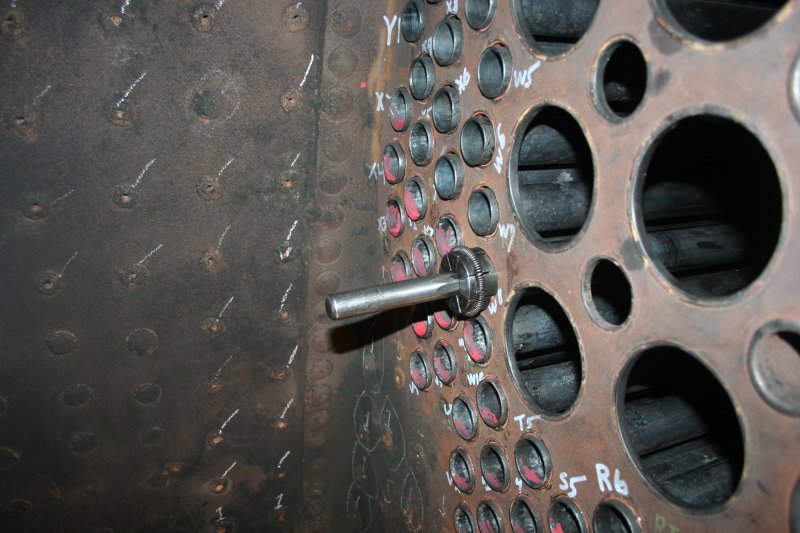
This is the expansion tool. The central steel pin is octagonal and drives the segments outward as it is driven between them. Several tools of this general type are used in the overall tube fitting process but this one is unique in having projecting "feet" on alternating segments. When in use, these bear against the tube sheet. This means that, as the tool is hammered, outward force is applied to the walls of the tube but the substantial forward force is not applied to the tube, but born by the tube sheet thru these feet.
There is a careful process of adjusting the projection of the tube to 1/4 inch minimum thru the rear sheet then, before anything else, the tube is locked at the front. Here Dave is applying the clamp.
This tube is now clamped into place to, hopefully !, prevent it shifting as the rear end is expanded. This clamping should hold the tube against a certain amount of forward pressure as the tube expands against the ferrule. However, the feet noted above are critical in ensuring that the force of the air hammer itself is not applied to the tube. Were that to happen, this clamp would be thrown off at the first impact !.
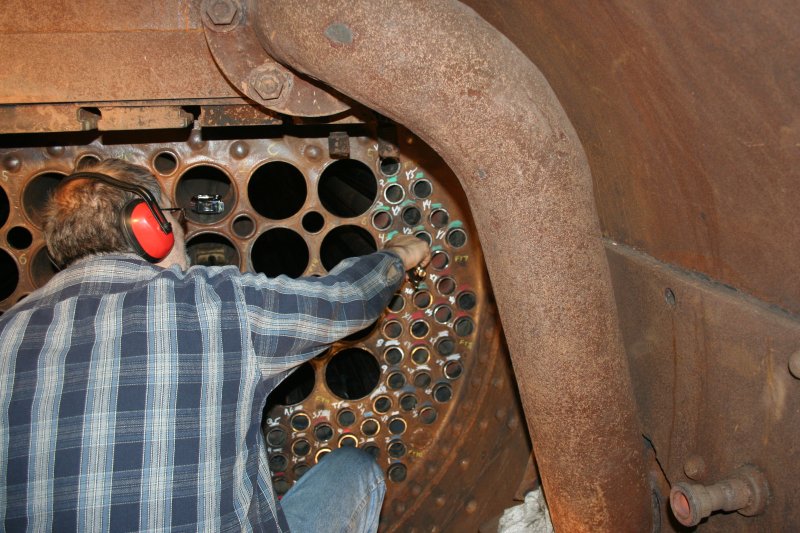
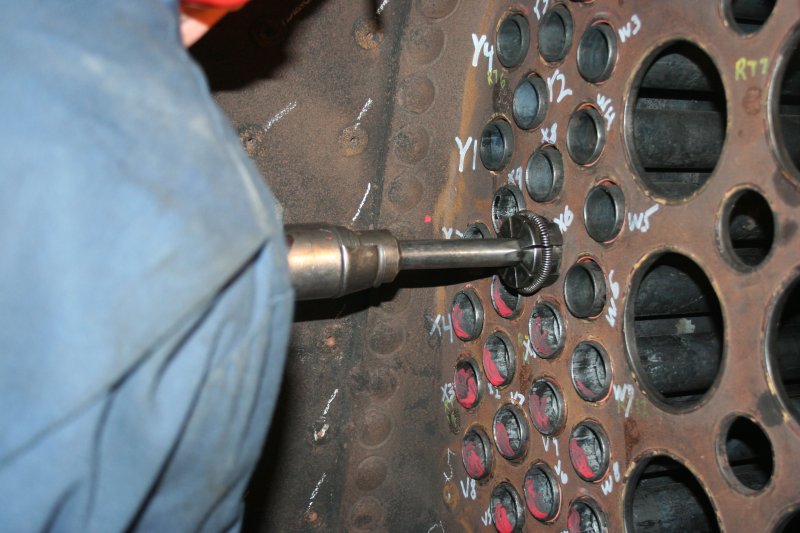
The expander is then inserted in the firebox end after confirming, by shining a flashlight down the tube from the smokebox end, that we are working with the same tube at each end. Important as it is a real bad idea to hammer a tube that is not the one secured at the smokebox end.
The pin is then hand hammered to expand the segments sufficiently to lock the expander into the tube end.
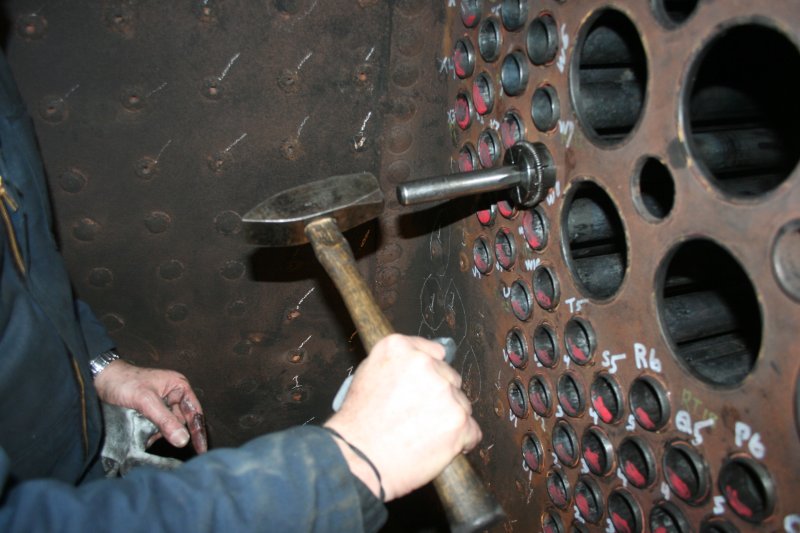
The air hammer is then applied
... and power applied until the pin is fully driven home. You can see by comparing this to the previous view that the travel and therefore the expansion of the segments, is quite substantial.
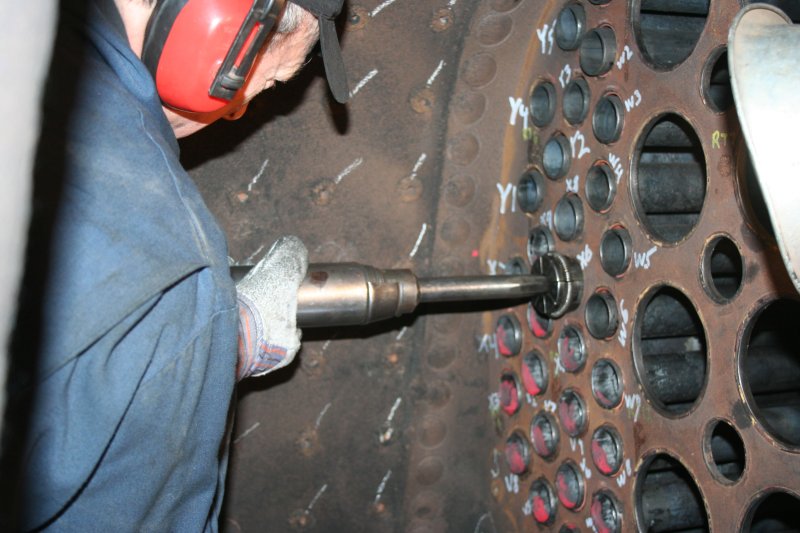
Then the pin is hand hammered at the end to loosen it. Regular application of lard to the pin is important to ensure that it releases. It is a finely balanced process. Substantial force is required to release the pin, which is initially locked into place by the force of a substantial; air hammer. It can often take many substantial blows to initially free the pin but, when it does free, the slope of the lubricated faces of the pin tend to drive it out. So it is real important to listen for the change in sound as the hammer it the pin. There is a real change in tone as the pins starts to free and if you do not notice this and keep hammering the pin can easily shoot out. Then you have the fun of groveling in the bottom of the firebox to recover the tool and pin!. The tool is then turned in the tube, secured and air hammered twice more and you have another tube fully expanded into the rear tube sheet. On 428: · Jerry continued grinding old braze metal from the boxes to prepare the surfaces for Dennis to weld in the reinforcing plates; · Tom continued planing the wedges used to adjust the axle boxes in the frames. So a good day's progress with a small team. Nigel Sunday, January 27. 2013Steam Department Update 01-26-2013Steady progress on a number of fronts in the steam shop this weekend. There are no photographs this week as I spent most of the afternoon inside the firebox with an air hammer !. On 1630 it was a case of pushing on with the same key tasks:
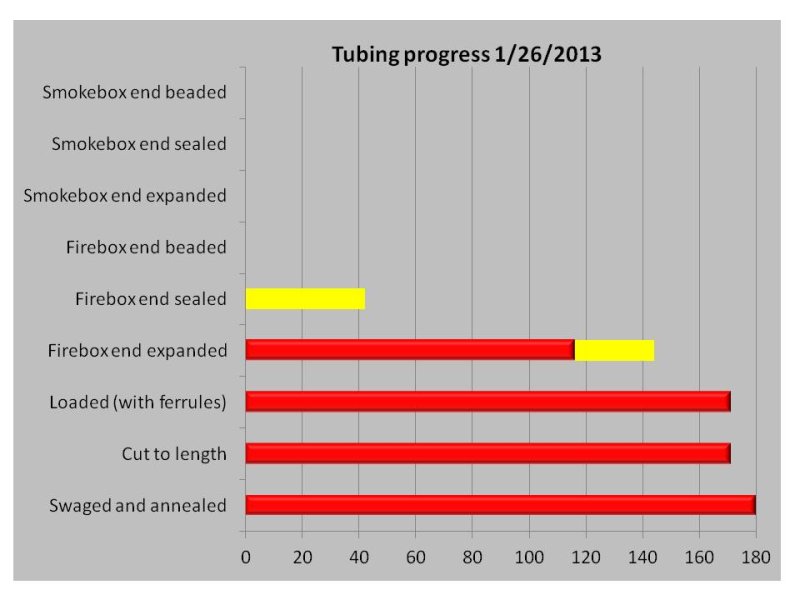
· We had a setback in the morning when the new tube roller, that had finally arrived, proved to be too small in diameter for the firebox tube ends. The intent with the new roller had been to simultaneously seal the tube end into the tube sheet and make the flare, which is the first step towards beading the end of the tube. Plan B was therefore adopted !. The expander can be used to fully seal the tube ends into place. It is just a slower process requiring a good deal more heavy work from the operator, which my wife would probably say is a darn good thing in my case !. Essentially, instead of air hammering each tube once to set it into place, fully sealing the end requires that you do this three times. Each time the expander must be released by hammering the central pin, turned a little, hammered back into the tube end to seat it and then air hammered again. Using this method, by end of day, we had set all but a few tubes higher up on the fireman's side. All the tubes we set this weekend were subject to the full process so they are sealed and ready to rolled in the smokebox to seal them into the front tube sheet. (The firebox end must be fully sealed to ensure that the tube cannot move before the front end is rolled ). In addition a number that had been set last week were fully sealed. The objective of this approach is that we now have a substantial number of tubes that can be sealed into the smokebox tubesheet, so that we can keep on working in the smokebox when the patch team needs access to the firebox. · This week we had free access to the firebox as Dennis and Mike were finalizing the remaining holes in the patch away from the firebox. The patch should be ready for final fitting next weekend. · Ed continued with the pipe fitting. We have now reached the stage where I have to locate the pictures of how the cab fitting looked before stripping so that the cab end of the new pipes can be set up correctly. · Richard and Lorne removed the timber supporting the cab awning. That became a fairly brutal process. Since it was held to the cab by coach bolts and the timber had rotted, allowing the bolts to turn, cutting the nuts off in the cab was about the only method of getting the timber off the cab; · Vince was setting up for machining the spacing ring that we need to fit one of the super heater flues. No one is real clear why but the hole for the top right super heater flue is about 1/4 inch bigger than all the others so requires a spacing ring when the flue is rolled into the sheet. In other areas: · The decision was taken to set up the new compressor as a direct replacement of the existing one. That means we will not set it up fully until the weather improves. However we will need to ensure that it is fully tested before we start the replacement as we will have nothing but the Sullair as an air source while we do the switch; · Lorne continued the cleaning of the Shay truck. Hopefully we should be able to finally inspect and repaint that shortly; · The new high pressure line for the planer was assembled; · A number of tasks were progressed on 428: o Tom is working on machining the new axle box wedges on the shaper; o Jerry continued grinding out the axle box channels in preparation for welding in the reinforcing plates; o Work restarted on reassembling the air pump. Nigel |
Blog AdministrationCalendar
QuicksearchSyndicate This Blog |
|||||||||||||||||||||||||||||||||||||||||||||||||


Comments
Mon, 09-08-2025 08:22
Good job on the Burlington Nortern 9976. OK.
Tue, 08-12-2025 12:56
No new news that I have heard of thus far.
Tue, 08-12-2025 12:53
I'll also be doing another update on it soon. Keep en eye out for that.
Tue, 08-12-2025 12:47
A little work was done to it for Diesel Days this year. You'll see photos floating around for the temporary short term job that was done to make it [...]
Wed, 08-06-2025 13:01
Is steam car CN 15444 going to be coming to museum several times it was to be moved to muesum
Sat, 07-19-2025 18:56
Yeah, sadly it's still there as of 7/19/2025
Thu, 06-12-2025 19:14
Its been 14 years guys, where is the unit? Like really? Did you guys misplace it? Or are repairs taking that long? At this point be might we will have [...]
Wed, 04-09-2025 17:40
Jamie Thanks for the update. She's gonna shine like every thing else you guys do! Smeds
Thu, 03-06-2025 16:28
Yes, there is a wye. Those two have been MU'ed on diesel days a year or two ago.
Wed, 03-05-2025 14:04
7009 number boards look good. Is there a way to turn a locomotive around at IRM? In case you ever had a mind to connect 7009 and 6847?
Fri, 03-29-2024 21:26
We're slackers and spend more time working on the equipment in the shop than keeping all you readers updated. We'll work on it, but I'm sure updates [...]
Thu, 03-14-2024 08:02
What happened to the Department Blog? It's been over 2 years and I still regularly check for updates, but nothing comes...